Category Archives: Lab Environment

Apache SSL Server on CentOS

After getting Apache running on Ubuntu, I also got Apache running in CentOS 6.3.  This went as smoothly as it did on Ubuntu.  The following are the steps I took to get it running.  As usual, CentOS was installed as a VM under VMWare player.

Unlike with Ubuntu, Apache comes pre-installed on CentOS and so all that was required to get it running was to start the httpd daemon and configure it to start when the server is booted:

# /etc/init.d/httpd start
# chkconfig --levels 235 httpd on

To implement SSL, the same steps as under Ubuntu were required. First I installed OpenSSL and generated the key and self signed certificate:

# yum install mod_ssl openssl
# openssl genrsa -out ca.key 2048
# openssl req -new -key ca.key -out ca.csr
# openssl x509 -req -days 365 -in ca.csr -signkey ca.key -out ca.crt

Of course for a real web site, the contents of the csr file is sent to a Certificate provider (Verisign, GeoTrust, etc.) who would then return the certificate to be included in the ca.crt file.  The steps below are then followed as shown.

I then moved the files to the correct location:

# cp ca.crt /etc/pki/tls/certs
# cp ca.key /etc/pki/tls/private/ca.key
# cp ca.csr /etc/pki/tls/private/ca.csr

Edited ssl.conf and updated the following two lines with the new key and certificate:

SSLCertificateFile /etc/pki/tls/certs/ca.crt
SSLCertificateKeyFile /etc/pki/tls/private/ca.key

I then restarted httpd.  This allowed the local browser to access the web page via SSL  http worked with ipv6 without any special configuration. https had issues because the browser could not “obtain identification status for the site.” and therefore would not allow me to add the exception.  I fixed this by adding an entry in the /etc/hosts file with a name that matched the certificate:

192.168.239.138 www.ssltest.com
fdc1:b20c:c011:1:20c:29ff:fe1d:635f www6.ssltest.com

Finally, I created a test index file under: /var/www/html/vhosts/ssltest.com/httpdocs and edited /etc/httpd/conf/httpd.conf to have a virtual host www.ssltest.com:

NameVirtualHost *:80
NameVirtualHost *:443

<VirtualHost *:80>
     DocumentRoot /var/www/html
     ServerName www.localhost.com
     ErrorLog logs/ssltest.com-error_log
</VirtualHost>

<VirtualHost *:80>
     DocumentRoot /var/www/html/vhosts/ssltest.com/httpdocs
     ServerName www.ssltest.com
     ErrorLog logs/ssltest.com-error_log
</VirtualHost>

<VirtualHost *:80>
     DocumentRoot /var/www/html/vhosts/ssltest.com/httpdocs
     ServerName www6.ssltest.com
     ErrorLog logs/ssltest.com-error_log
</VirtualHost>

<VirtualHost *:443>
     SSLEngine on
     SSLCertificateFile /etc/pki/tls/certs/ca.crt
     SSLCertificateKeyFile /etc/pki/tls/private/ca.key
     DocumentRoot /var/www/html
     ServerName www.localhost.com
     ErrorLog logs/ssltest.com-error_log
</VirtualHost>

<VirtualHost *:443>
     SSLEngine on
     SSLCertificateFile /etc/pki/tls/certs/ca.crt
     SSLCertificateKeyFile /etc/pki/tls/private/ca.key
     DocumentRoot /var/www/html/vhosts/ssltest.com/httpdocs
     ServerName www.ssltest.com
     ErrorLog logs/ssltest.com-error_log
</VirtualHost>

<VirtualHost *:443>
     SSLEngine on
     SSLCertificateFile /etc/pki/tls/certs/ca.crt
     SSLCertificateKeyFile /etc/pki/tls/private/ca.key
     DocumentRoot /var/www/html/vhosts/ssltest.com/httpdocs
     ServerName www6.ssltest.com
     ErrorLog logs/ssltest.com-error_log
</VirtualHost>

The first virtual host was added as the default page to answer requests directed to the ip address (for example Error:404 or some such thing.  The error page was placed in the default html directory.   I also added both host entries to my Windows7 workstation and everything worked as expected.
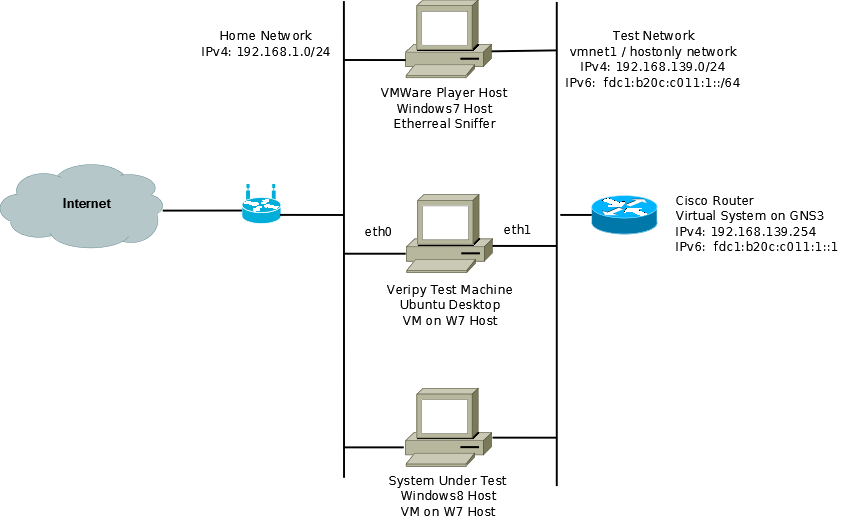
veripy Lab Setup

The lab I planned on using for this project centered around a Ubuntu desktop client installed as a VM under VMWare player.   In order to provide IPv6 connectivity, I used GNS3 with a virtual Cisco router running IOS 12.4(21).  I used a evaluation version of Windows8 as the system to run the tests against.  Windows8, even though it is an evaluation version which I got as a beta version seems to keep itself up to date, so I figure it should pass with flying colors.  To monitor much of the testing I planned on using Etherreal which is installed natively on my Wondows7 host workstation.  The following diagram should make everything clear:

Installing veripy took longer than expected due to my lack of knowledge about Python.  Python is an interpreted programming language which is supported by default under Ubuntu.  I have never installed or used a Python based application and so learned a lot about how Python works during this installation, mostly because I have trouble following directions.  veripy required a couple of other Python based applications to make it work, the most important of which is Scapy, the program used to generate the IPv6 packets (especially the bad ones, wrong version number, etc.).  Most Python modules are installed like normal applications using the “appget” command.  Modules are installed under the Python directory.

I started by downloading the veripy-1.0.1.tar.gz archive and unpacking into a subdirectory called Apps (/home/cbroccoli/Apps).  Since veripy does not install as a standard Python module (see how Scapy was installed below to see that), I had to add the location of the base veripy files to the PYTHONPATH environment variable.  This was done by adding the following line to the /etc/environment file:

PYTHONPATH="/home/cbroccoli/Apps/veripy"

Adding the variable to the /etc/environment file ensures that the environment variable is persistent across terminal windows, reboots, etc.  To confirm that the change worked run the following command:

$ printenv PYTHONPATH

With this done, I installed the applications which are required for scapy:

$ sudo apt-get install tcpdump graphviz imagemagick python-gnuplot 
python-crypto python-pyx

Finally, I downloaded and installed Scapy:

$ cd /home/cbroccoli/Downloads
 $ wget scapy.net
 $ unzip scapy-latest.zip
 $ cd scapy-2.*
 $ sudo python setup.py install

Now I was ready to run the tests.

Lab Setup with GNS3 and VMWare Player 3.x

So I have finally gotten around to setting up a lab using VMWare Player and GNS3.  I thought I would give it a test just to see how it would work.  I have already installed Ubuntu desktop in VMWare, which of course is simple.  Even enabling the extenstions for transparent mode, full screen, etc. worked fine. My goal, however, was to get GNS3 working so I could continue with further IPv6 tests.

VMWare Player sets up two interfaces: Vmnet1 and Vmnet8.  Vmnet1 is used for the host only network and vmnet8 is used for the nat network.  When I configured GNS3, I  connected the cloud interface to vmnet1.  Once this is done, any router connected to the cloud is in the same network as any VM placed in the host only network.  Compared to the effort it took me to setup Vbox with GNS3 (posted earlier), this time it was quite simple.  Could be that now I have more experience with setting these things up though.