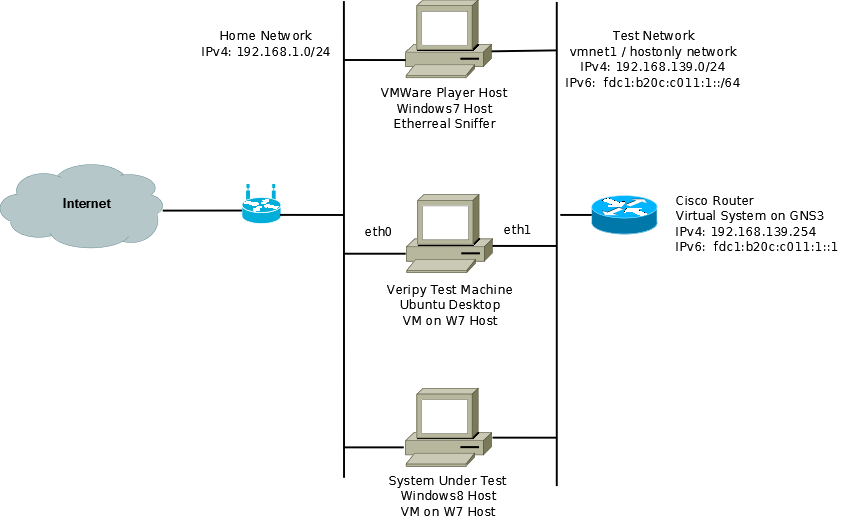
This is the third in a series of posts about assessing the readiness of an enterprise’s ICT environment for IPv6.
The testing did not go a smoothly as planned, since veripy does exhaustive testing of the node under test (aka the NUT). This means that if you let it run through everything, it will take a number of hours (I never made it due to a lack of patience) and has a number of points where you need to enter “y” or “n” or input an IP address for it to ping. It also requests that you rest the NUT’s interface a number of times to see that it responds correctly under different conditions to SLAAC address delivery. So after a couple of trial runs, I commented out all of the “host” testes in the veripy configuration file, veripy.cfg, except for the BasicI IPV6 Compliance test. Even this took about 30-45 minutes. I also updated the configuration file with the information about the network and the Windows 8 client as follows:
[test-network]
link-layer: Ethernet

links: 1, 2, 3
link-1-v4: 10.0.0.0/24
link-1-v6: 2012:7665:7269:7079::/64
link-2-v4: 192.168.239.0/24
link-2-v6: fdc1:b20c:c011:1::/64
link-3-v4: 10.2.0.0/24
link-3-v6: 2012:6d77:7269::/64

nodes: tn1, tn2, tn3, tn4
tn1-ifaces: 1
tn1-if0-address: de:ad:be:ef:01:02
tn1-if0-ips: fdc1:b20c:c011:1::ef:102, fe80::7a2b:cbff:feef:102,
 fe80::7a2b:cbff:feca:ad05
tn2-ifaces: 1
tn2-if0-address: de:ad:be:ef:01:03
tn2-if0-ips: 2012:7665:7269:7079::ef:103, fe80::7a2b:cbff:feef:103
tn3-ifaces: 1
tn3-if0-address: de:ad:be:ef:01:04
tn3-if0-ips: 2012:7665:7269:7079::ef:104, fe80::7a2b:cbff:feef:104
tn4-ifaces: 1
tn4-if0-address: de:ad:be:ef:01:05
tn4-if0-ips: 2012:6d77:7269::ef:105, fe80::7a2b:cbff:feef:105

routers: tr1, tr2, tr3
tr1-ifaces: 2
tr1-if0-address: be:ef:ca:fe:01:01
tr1-if0-ips: 2012:6970:7636::fe:101, fe80::7a2b:cbff:fefe:101
tr1-if1-address: be:ef:ca:fe:01:02
tr1-if1-ips: fdc1:b20c:c011:1::fe:102, fe80::7a2b:cbff:fefe:102
tr2-ifaces: 2
tr2-if0-address: be:ef:ca:fe:01:03
tr2-if0-ips: 2012:7665:7269:7079::fe:102, fe80::7a2b:cbff:fefe:102
tr2-if1-address: be:ef:ca:fe:01:04
tr2-if1-ips: fdc1:b20c:c011:1::fe:103, fe80::7a2b:cbff:fefe:103
tr3-ifaces: 2
tr3-if0-address: be:ef:ca:fe:01:05
tr3-if0-ips: 2012:7665:7269:7079::fe:103, fe80::7a2b:cbff:fefe:103
tr3-if1-address: be:ef:ca:fe:01:06
tr3-if1-ips: fdc1:b20c:c011:1::fe:104, fe80::7a2b:cbff:fefe:104

taps: tp1, tp2
tp1-dev: eth1
tp1-address: 00:0c:29:8e:de:a1
tp2-dev: eth0
tp2-address: 01:02:03:04:05:07
Before running any tests, I started the GNS3 based Cisco router and the Windows 8 PC. While the tests were running, the network configuration of the Windows 8 PC looked like this:
C:\Windows\system32>ipconfig /all
Windows IP Configuration
   Host Name . . . . . . . . . . . . : Window8PC
   Primary Dns Suffix  . . . . . . . :
   Node Type . . . . . . . . . . . . : Hybrid
   IP Routing Enabled. . . . . . . . : No
   WINS Proxy Enabled. . . . . . . . : No
   DNS Suffix Search List. . . . . . : localdomain

Ethernet adapter Ethernet 2:
   Connection-specific DNS Suffix  . : localdomain
   Description . . . . . . . . . . . : Intel(R) PRO/1000 MT Network
                                       Connection #2
   Physical Address. . . . . . . . . : 00-0C-29-35-A0-FB
   DHCP Enabled. . . . . . . . . . . : Yes
   Autoconfiguration Enabled . . . . : Yes
   IPv6 Address. . . . . . . . . . . : fdc1:b20c:c011:1:9927:f9dc:7bf9
                                       :f834(Preferred)
   Temporary IPv6 Address. . . . . . : fdc1:b20c:c011:1:589b:17bd:9e48
                                       :40e6(Preferred)
   Link-local IPv6 Address . . . . . : fe80::9927:f9dc:7bf9:f834%22
                                       (Preferred)
   IPv4 Address. . . . . . . . . . . : 192.168.239.132(Preferred)
   Subnet Mask . . . . . . . . . . . : 255.255.255.0
   Lease Obtained. . . . . . . . . . : Tuesday, December4,2012 11:51PM
   Lease Expires . . . . . . . . . . : Wednesday, December5,2012 1:51AM
   Default Gateway . . . . . . . . . : fe80::7a2b:cbff:fefe:102%22
                                       fe80::7a2b:cbff:fefe:103%22
                                       fe80::7a2b:cbff:fefe:104%22
                                       fe80::ce00:27ff:fe1c:0%22
   DHCP Server . . . . . . . . . . . : 192.168.239.254
   DNS Servers . . . . . . . . . . . : 192.168.239.1
   NetBIOS over Tcpip. . . . . . . . : Enabled
The test was started using the following command:
$ sudo ./bin/veri.py \
 -c veripy.cfg \
 -f T /home/cbroccoli/Desktop/win8_test.txt \
 -f H /home/cbroccoli/Desktop/win8_test.html \
 -t 1 fdc1:b20c:c011:1:9927:f9dc:7bf9:f834 \
 fe80::9927:f9dc:7bf9:f834 \
 192.168.239.132 \
 00:0c:29:35:a0:fb \
 host
This placed the results into a html file named win8_test once the tests were completed. Some cool features of veripy are that along with the html report, it captures all packets on the network into a pcap file which can be viewed with Etherreal. The files can be opened via a link on the report page next to each individual test. Below is a screen shot of the report page:

All in all I accomplished what I was set out to do. The results for the Windows 8 client are not necessarily correct since the client was running on VMWare Player which may have filtered out some of the malformed packets. veripy recommends using a crossover cable to do the tests so in a lab environment, this would probably also make a lot of sense. Also I am using a pre-release version of Windows 8, so the released version may be better at handling the error conditions. Nevertheless a very interesting exercise!

