Spending a lot of time working with customers to define an Azure adoption framework, so thought I would look into ARM templates to get a better feel for how to automate and code-ify the deployment of Azure resources and policies.
ARM templates can be deployed in a similar manner to GCP deployment manager templates. ARM templates are defined in JSON, GCP DM in YAML/Jinja. Both have a deployment manager where you can monitor the success or failure of the deployment in the console.
ARM templates consist of 3 basic parts; parameters, variables and resources. Parameters define the inputs needed to execute the template (including the type, default value and acceptable values if you need to limit them), variables are a way of providing parameter values dynamically or by building them based on a standard structure (e.g. a naming convention). Resources are the definition of which resources need to be deployed in the template.
{
 "$schema":"https://schema.management.azure.com/schemas/2018
 -05-01/subscriptionDeploymentTemplate.json#",
 "contentVersion": "1.0.0.0",
 "parameters": {
   "budgetName": {
      "type": "string",
      "defaultValue": "MyBudget",
      "metadata": {
         "description": "Name of the Budget. It should be
         unique within a resource group."
      }
    },
   "amount": {
     "type": "string",
     "defaultValue": "1000",
     "metadata": {
       "description": "The total amount of cost or usage to
       track with the budget"
     }
   },
...
 }
},
 "variables": {
   "uniquebudgetName": "[concat(parameters('amount'), '-',
   parameters('firstThreshold'), '-budget')]"
},
 "resources": [
   {
   "type": "Microsoft.Consumption/budgets",
   "apiVersion": "2019-10-01",
   "name": "[variables('uniquebudgetName')]",
   "properties": {
     "timePeriod": {
       "startDate": "2021-02-01T00:00:00Z",
       "endDate": "2022-02-01T00:00:00Z"
     },
   "timeGrain": "[parameters('timeGrain')]",
...
   }
 ]
}
Parameter inputs which are not defined already via variables, can be defined either at run time through the command line, via a parameter file or via the console with an input form.
{
 "$schema": "https://schema.management.azure.com/
 schemas/2019-04-01/deploymentParameters.json#",
 "contentVersion": "1.0.0.0",
 "parameters": {
   "budgetName": {
     "value": "budget1"
   },
   "startDate": {
   "value": "2021-02-01T00:00:00Z"
   },
   "endDate": {
     "value": "2022-02-01T00:00:00Z"
   },
   "timeGrain": {
     "value": "Monthly"
   },
   "amount": {
     "value": "10"
   },
   "firstThreshold": {
     "value": "10"
   },
   "contactEmails": {
     "value": [
       "chris@broccolifamily.net"
     ]
   }
 }
}
There are a couple of ways to execute a template file. Either through the console (didn’t bother with this since it seems counter productive), CLI, or a CI/CD pipeline.
az deployment group create \
  --name armbudget \
  --resource-group resourcegroup1 \
  --template-file $templateFile \
  --parameters $prodParameterFile
Of course the two environment variables, need to be set to point to the appropriate files. The –parameter flag can also have a list of parameters and their values instead of pointing to the file.
My tests followed one of the canned tutorials but I extended it to add my own parameter file. Executing a CI/CD pipeline requires a parameter file to be used if you don’t want to keep updating the pipeline every time you change a parameter value (just update the parameter file and the pipeline can just run triggering on the change to the parameter file).
The final template which I used, along with the working parameter file are located here.
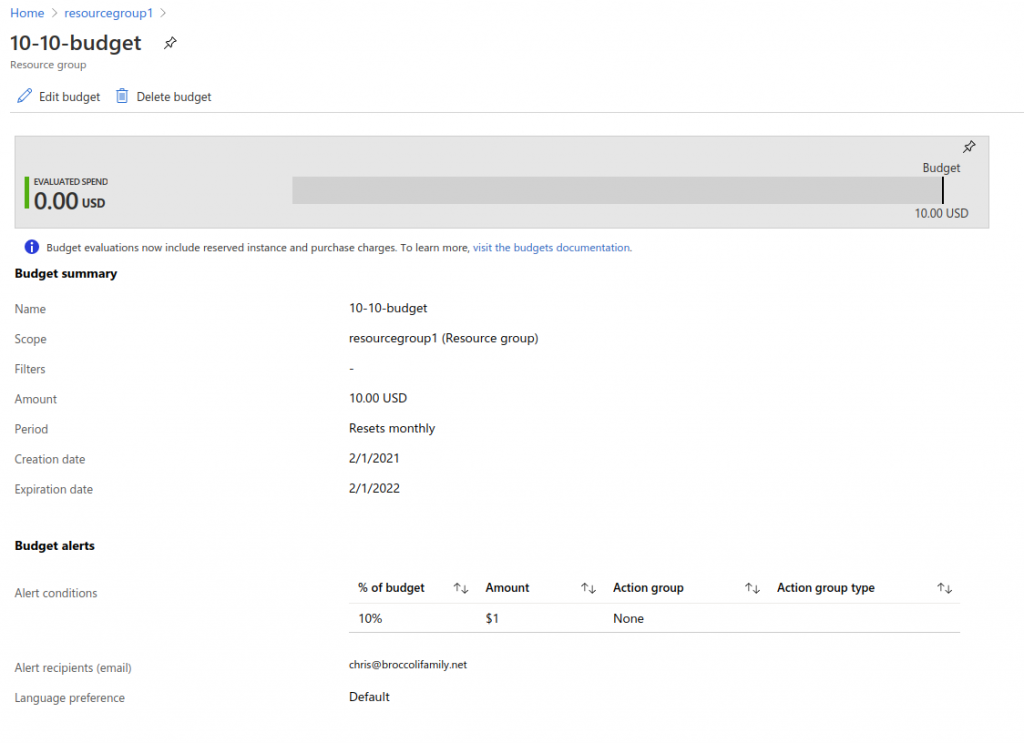
The result in the console looks like this…